Showing posts with label DIY. Show all posts

Wednesday, February 3, 2010

Wing it like Wang

It's time for a new DIY project, what do you think? Yes? Great, because today we're making Alexander Wang ripped chain shorts knock-offs.

SRSLY, why buy when you can DIY?

You will need:
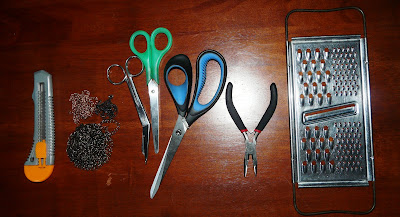
And a block of wood or any solid surface that can work as your cutting board.


1. First, cut an old pair of jeans with scissors. Always keep the extra fabric for future projects.


2. Optional: I cut out the excess thread from my hem of my shorts because I didn't want it to look too rugged. Tip: to get an honest to goodness, worn-to-death look to them, scrub a hard metal sponge or sandpaper onto your jeans.


3. Rub the cheese grater onto places where you want the rips. Target the hems and the edges of pockets because that's where natural distressing occurs. But since we're "Wang-ing" it today, the thigh vicinity should be the area for major distressing. You will see that the fabric will start to rip. Just continue the process until you get the desired size of the holes.


4. Optional: I whipped out my cutter to create more distress such as holes and tears, then went back to fraying with my cheese grater. I didn't know about the greatness of graters until this project... and woah i purred like a kitten when I saw the results. This kitchen tool is genius!


5. Put the chains through the holes...


6. Hook the chains together.


7. Repeat a few more times.


AND VOILA ALL DONE!!!

8. Optional: Camwhore. Hahaha.


This was supposed to be my first post for a new fashion website that I'll be contributing to. But since our editorial calendar got moved, I figured I'll post this one here instead. Wow, there really hasn't been a dull moment in Bend & Snap since I've been on the "courtship stage" with BAS clothing. Watch out for the next BAS/risa adventures! Until then, take care. :)

Thursday, January 21, 2010

The Reset Button

WHY BUY WHEN YOU CAN DIY...A BUTTON BIB NECKLACE!

1. Gather your materials and start conceptualizing how you want it to look. I decided to use monochromatic-colored buttons because it just adds to the classy factor. 2. Apart from time, here's the stuff which you need (See i was debating whether to use the yellow and red theme vs. the blue one) 3. I decided to use a half-circle shape for the base of the necklace. (Ooo yes, a protractor, ruler and pencil are also needed!)
4. Start glue gunning like crazy! But don't use too much so that the buttons don't pop up. We want the necklace to be as flat and as clean as possible.
IN GLUE WE TRUST.

5. Sew chains behind the necklace.Fin! I was ready to head out for a really, really busy day: Photoshoot at 9, Meeting with website developer (Hey chrys! Don't cha just sound so professional?) at 1130, Supply Chain Management (another fancy way of puttings things) and buyer activities from 2-630pm!

Oh and i finally opened my Teen Vogue Handbook which is full of advice, pictures and in-depth profiles of fashion legends for young hopefuls like me. It comes with a 1 year subscription too, thank you very much!!!Thinking of scanning helpful pages from the book and posting more stray thoughts tomorrow.

LOVELY DAY.

Saturday, October 3, 2009

DIY: Chain of Cool

Enlightened by the gods of rock, heavy metal abides by the code of conduct --- that indeed, more is more. So stop being the weakest link and become battle-ready with the layered chain look!
K D' Angelo Designs, $120

Danijo "Lennon", $420

(from tamisonline.com)


(from Staaldesign.com)

Since I can't afford those I figured it's best to DIY. Just pile some old links (or chain belts) and you’re ready to toughen up your basic tee. Look, I joined the chain gang too!


TADA! :)

XOXO, Risa